

Workflow for Editing in Adobe Lightroom
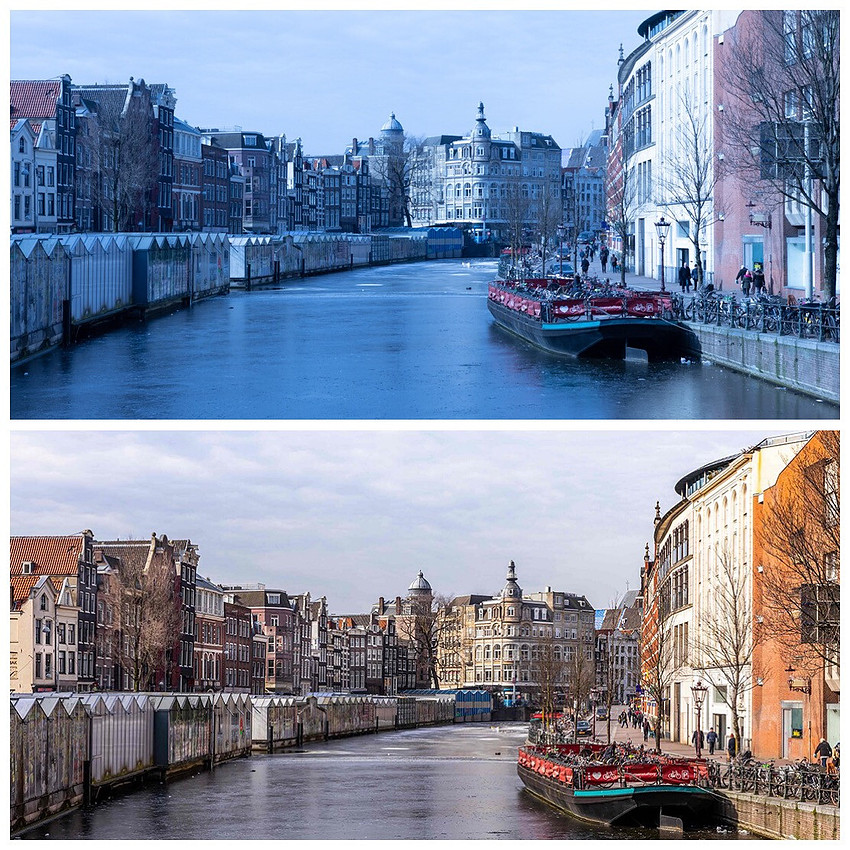
This is a topic that I've been getting asked about a lot lately so I wanted to quickly touch on my workflow for creating the images I've been posting. I'm going to use the Image above as reference but everything stated can apply to nearly all photos.
In the picture above, the top half is the camera raw file from the 80D. While it looks blue, that was the effect lightroom interpreted on the photo making the white balance very color. It tends to want to correct and tell you want the setting should be. That being said....
Step 1. Adjust color balance ( Pic was was warmed up)
Step 2. Bring Down the Highlights
Step 3. Open up shadows all the way.
Step 4. Hold Control+ALT and adjust whites until they start to appear. By holding control+ALT the picture goes black. As you slide whites bar they will appear as they get brighter.
Step 5. Hold Control+ALT and adjust black until they appear.
Step 6. I add a little clarity to photo. Roughly 20-25
Step 7. Add slight saturation ( 5-10 is the highly I go. However if that's the stylized look you wanted go for it, it's all subjective at the end of the day)
Step 8. Sharpening. I will slide this 50-60
Step 9. Noise reduction. I will slide this to the difference of what I sharpen. For example if sharpening is 60 then noise reduction will be 40
Step 10. Go the the masking slider in the sharpening panel. Here hold control+ALT again and you can control what is sharpened. Black is everything that is NOT sharpened and white is what's been affected.
Step 11. I click profile corrections
Step 12. I usually click auto align, however it depends on the picture and the results. If a wide angle lens is used the result can sometimes be unusable unless further work in photoshop is done.
Step 13. Scroll up and adjust contrast and exposure.
I tend to keep it simple and straight forward. I don't like to spend hours editing my images. This is the basic workflow that I use to adjust images. While 13 steps can look like a lot, this takes roughly 5 minutes at most.
If I want to be creative then I start paint exposure in places I want it lowered or raised. In the picture above the sheds along the water were painted with -56 exposure along with some of the water to bring it down.
Painting the exposure on pictures can emphasize and try the attention of the viewer to where YOU want them to look.
This was a quick one this week but I just wanted to touch on the process I use. y no means is this the best or even only way. It's just want works best for me.
